Home Blog Page 11

HyperMount Phone Mount Review: Is It Worth It?

0

You’re navigating traffic, checking maps, maybe even switching songs—and your phone keeps slipping or falling. It’s frustrating… and unsafe.

That’s exactly where a reliable magnetic phone mount like the HyperMount Gen 2 steps in.

But is it actually worth your money, or just another overhyped gadget?
HyperMount Phone Mount Review

Quick Summary

  • Best for: Drivers, content creators, and hands-free users
  • Key highlight: Ultra-strong nano-suction + magnetic grip
  • Compatibility: Works with iPhone, Samsung Galaxy, and Android devices
  • Standout feature: 360° rotation + reusable adhesive
  • Drawback: No wireless charging support

👉 Want to check current pricing? Scroll down for recommendations.


What Is the HyperMount Gen 2 Phone Mount?

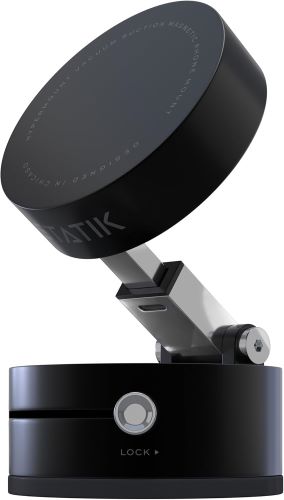
The HyperMount Gen 2 is a magnetic phone holder designed for cars and multi-surface use. Unlike traditional mounts, it uses:

  • Nano-suction adhesive (no permanent glue)
  • Strong magnetic hold
  • Universal compatibility

It’s built for flexibility, use it in your car, on a desk, mirror, or even kitchen wall.


Key Features & Benefits

1. Ultra-Strong Nano-Suction Base

The improved nano-suction adhesive sticks firmly to:

  • Glass
  • Dashboard surfaces
  • Mirrors
  • Polished stone
  • Lightly textured areas

Why it matters:
You don’t have to worry about the mount falling off mid-drive.

Must Read : How to Speed Up Windows 11 on a Low-End PC (2026 Guide)


2. Powerful Magnetic Grip

With up to 66 pounds of force resistance, your phone stays locked in place—even on bumpy roads.

For Android users, it includes magnetic rings for easy compatibility.


3. 360° Rotation for Perfect Angles

Whether you’re:

  • Using GPS
  • Watching videos
  • Recording content

You can easily switch between portrait and landscape mode.


4. Multi-Purpose Usage

This isn’t just a car mount.

You can use it for:

  • Hands-free driving
  • Video calls at your desk
  • Following recipes in the kitchen
  • Taking selfies or filming content

Must Read : Best Philips 24 Inch Monitor in 2026 – Full HD, Affordable & Reliable


5. Wide Device Compatibility

Works seamlessly with:

  • iPhone (MagSafe-ready)
  • Samsung Galaxy
  • Other Android phones (with included rings)

Pros and Cons

ProsCons
Strong magnetic holdNo wireless charging
Reusable nano-suction baseNot ideal for very rough surfaces
Easy installationRequires magnetic ring for some phones
Multi-surface usabilityNo built-in charging port
Sleek, compact designSlight learning curve for placement

Real-World Use Cases

🚗 Driving & Navigation

Perfect for GPS navigation without taking your eyes off the road.

🎥 Content Creation

Mount your phone anywhere to record videos or reels.

🍳 Kitchen Companion

Stick it to tiles or cabinets while following recipes.

💻 Work Setup

Use it as a minimal phone stand on your desk.


HyperMount vs Other Phone Mounts

FeatureHyperMount Gen 2Traditional Clamp MountVent Mount
InstallationEasy (stick-on)ModerateEasy
StabilityVery HighMediumLow
PortabilityHighMediumHigh
Surface FlexibilityMulti-surfaceLimitedCar only
AestheticsMinimalBulkyCompact

Verdict:
HyperMount wins for versatility and clean design.


Who Should Buy the HyperMount?

This phone mount is ideal for:

  • Daily commuters
  • Uber/Ola drivers
  • Content creators
  • Minimalist desk setup lovers
  • Anyone tired of bulky mounts

Who Should Skip It?

You may want to consider alternatives if:

  • You need wireless charging built-in
  • Your surfaces are extremely rough or uneven
  • You prefer permanent mounts

Must Read : Useful Gadgets That Make Life Easier at Home (2026 Guide)


Buying Guide: What to Consider Before Choosing a Phone Mount

1. Mounting Surface

Make sure your surface is smooth or lightly textured.

2. Phone Compatibility

Magnetic mounts work best with built-in magnets or rings.

3. Adjustability

360° rotation is essential for flexibility.

4. Strength & Stability

Look for strong adhesive and magnet support.


FAQs (People Also Ask)

1. Does HyperMount work with all phones?

Yes, it supports most devices including iPhone and Android phones (with magnetic rings).


2. Can I reuse the adhesive base?

Yes, the nano-suction base is reusable—just clean it to restore grip.


3. Will it damage my dashboard?

No, it’s designed to be non-damaging when used on suitable surfaces.


4. Does it support wireless charging?

No, this mount does not include wireless charging functionality.


5. Is it safe for long drives?

Yes, the strong magnetic hold keeps your phone secure even on rough roads.


6. Can I use it outside the car?

Absolutely—it’s designed for desks, kitchens, mirrors, and more.


7. Is installation complicated?

Not at all. Just press it onto a clean surface and you’re ready.


Internal Linking Suggestions

  • Best car accessories for daily drivers
  • Magnetic vs clamp phone mounts
  • How to mount your phone safely in a car
  • Top productivity gadgets for your desk

Final Verdict: Is HyperMount Worth It?

If you want a clean, minimal, and highly versatile phone mount, the HyperMount Gen 2 is a strong contender.

It solves a real problem—keeping your phone secure without bulky setups.

While it lacks wireless charging, it makes up for it with:

  • Strong grip
  • Flexible usage
  • Simple design

👉 Recommendation:
If you value convenience, portability, and strong hold, this is worth checking out.


Final Thoughts

A good phone mount isn’t just about convenience, it’s about safety and usability.

The HyperMount Gen 2 strikes a solid balance between both.

And once you start using it, going back to traditional mounts might feel outdated.

Best Smart Speakers in 2026: Top Picks for Every Budget and Home

0

You’ve probably heard the hype around smart homes. But here’s the truth363—most setups still feel incomplete without a reliable smart speaker. Imagine controlling lights, playing music, checking the weather, and managing your day… all with just your voice.

Sounds convenient, right? But with dozens of options available in 2026, choosing the right smart speaker can feel overwhelming.

That’s exactly why this guide exists.

Best Smart Speakers in 2026 Top Picks for Every Budget and Home

⚡ Quick Picks

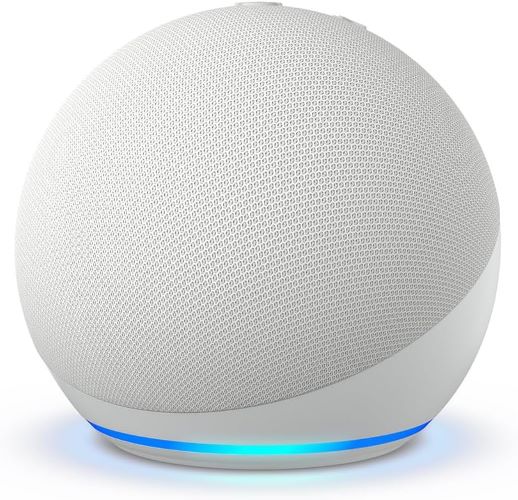
  • Best Overall: Amazon Echo Dot (Newest Model)
  • Best Budget: Google Nest Mini (2nd Gen)
  • Best Sound Quality: Apple HomePod (2nd Gen)
  • Best for Smart Homes: Amazon Echo (4th Gen)
  • Best Portable: JBL Link Portable

👉 Short on time? Scroll to the comparison table below.


🧠 What Makes a Smart Speaker Worth Buying in 2026?

Before jumping into product picks, let’s quickly understand what actually matters.

Key Features to Look For:

  • Voice Assistant (Alexa, Google Assistant, Siri)
  • Sound Quality (bass, clarity, room fill)
  • Smart Home Compatibility
  • Privacy Controls
  • Connectivity (Wi-Fi, Bluetooth, multi-room support)

💡 Pro Tip: If you’re building a smart home, compatibility matters more than sound.


🏆 Best Smart Speakers in 2026 (Detailed Reviews)


🔊 1. Amazon Echo Dot (Newest Model) – Best Overall

If you’re looking for a reliable, affordable, and feature-packed smart speaker, this is the one.

⭐ Key Features:

  • Crisp and vibrant sound for its size
  • Built-in Alexa voice assistant
  • Motion & temperature sensors for smart automation
  • Multi-room audio support
  • Strong privacy controls (mic off button)

🎵 Why It Stands Out:

This Echo Dot isn’t just about music. It’s a smart home control hub.

You can:

  • Turn on lights when you enter a room
  • Set routines based on temperature
  • Control fans, ACs, and smart plugs

🏠 Real-Life Use Case:

Imagine walking into your bedroom—and the lights automatically turn on while your favorite playlist starts playing.

That’s what this device does effortlessly.

👍 Pros:

  • Affordable and powerful
  • Great for beginners
  • Excellent Alexa integration
  • Compact design fits anywhere

👎 Cons:

  • Not ideal for audiophiles
  • Limited bass compared to premium speakers

👉 Check price | See full features | Learn more


🔊 2. Amazon Echo (4th Gen) – Best for Smart Homes

Looking to go beyond basics? This is your upgrade.

Highlights:

  • Premium sound with deeper bass
  • Built-in Zigbee smart hub
  • Seamless smart device control

Best For:

  • Users with multiple smart devices
  • Advanced home automation setups

👉 Check price | See full features


🔊 3. Google Nest Mini (2nd Gen) – Best Budget Pick

Want a smart speaker under a tight budget? This is a solid choice.

Features:

  • Google Assistant support
  • Decent sound for small rooms
  • Wall-mountable design

Ideal For:

  • Students
  • First-time users
  • Secondary rooms (kitchen, bathroom)

👉 Check price | Learn more


🔊 4. Apple HomePod (2nd Gen) – Best Sound Quality

If sound quality is your priority, this one delivers.

Why You’ll Love It:

  • Rich, immersive audio
  • Seamless Apple ecosystem integration
  • Spatial audio support

Not Ideal For:

  • Non-Apple users
  • Budget buyers

👉 See full features


🔊 5. JBL Link Portable – Best Portable Smart Speaker

Need a smart speaker you can carry around?

Features:

  • Built-in battery
  • Waterproof design
  • Google Assistant support

Perfect for:

  • Outdoor use
  • Travel
  • Balcony setups

👉 Check price


📊 Smart Speaker Comparison Table

ModelVoice AssistantSound QualityBest ForPrice Range
Echo Dot (New)Alexa⭐⭐⭐⭐Everyday useBudget
Echo (4th Gen)Alexa⭐⭐⭐⭐⭐Smart homesMid-range
Nest MiniGoogle⭐⭐⭐Budget usersLow
HomePod 2Siri⭐⭐⭐⭐⭐AudiophilesPremium
JBL LinkGoogle⭐⭐⭐⭐Portable useMid

🏠 How Smart Speakers Fit Into Daily Life

Still wondering if you really need one?

Here’s how people actually use them:

🎶 Entertainment

  • Play music, podcasts, audiobooks
  • Multi-room synchronized audio

⏰ Productivity

  • Set alarms, reminders, timers
  • Manage daily schedules

🏡 Smart Home Control

  • Lights, fans, AC, smart plugs
  • Security cameras and doorbells

🌦️ Quick Info

  • Weather updates
  • News briefings
  • Traffic alerts

🛒 Buying Guide: How to Choose the Right Smart Speaker

Before clicking “buy,” ask yourself:

1. Which Ecosystem Do You Use?

  • Alexa → Amazon devices
  • Google → Android users
  • Siri → Apple users

2. What’s Your Budget?

  • Under ₹5,000 → Echo Dot / Nest Mini
  • ₹5,000–₹15,000 → Echo / JBL
  • Above ₹15,000 → HomePod

3. Where Will You Use It?

  • Bedroom → Compact speakers
  • Living room → High-quality sound
  • Outdoor → Portable options

4. Privacy Matters?

Look for:

  • Mic-off buttons
  • App-based controls
  • Data transparency

❓ FAQs – Smart Speakers in 2026

1. Are smart speakers safe to use?

Yes. Most devices include privacy controls like mic-off buttons and data management settings.


2. Which is better: Alexa or Google Assistant?

  • Alexa = better for smart homes
  • Google Assistant = better for search & questions

3. Do smart speakers work without internet?

Limited features like Bluetooth playback work, but full functionality requires Wi-Fi.


4. Can I use multiple smart speakers together?

Yes! Multi-room audio is supported by most modern devices.


5. Which smart speaker is best for music?

Apple HomePod (2nd Gen) offers the best sound quality overall.


6. Are smart speakers worth it in 2026?

Absolutely—especially if you value convenience, automation, and hands-free control.


🏁 Final Verdict: Which One Should You Buy?

If you want a perfect balance of price, features, and performance, the Amazon Echo Dot (Newest Model) is the best choice for most users.

It’s:

  • Affordable
  • Smart-home ready
  • Easy to use
  • Packed with practical features

👉 Best for: Beginners, small homes, everyday use


💬 Final Thought

Smart speakers are no longer just “cool gadgets.” They’ve become everyday tools that simplify life.

Start small, pick the right ecosystem, and expand over time.

Your future smart home begins with a single device.

👉 Ready to upgrade? Check the latest deals and find the perfect smart speaker for your home today.

AI Tools for YouTube Script Writing (2026 Guide)

Struggling to write engaging YouTube scripts consistently? You’re not alone. Many creators hit a wall when it comes to structuring ideas, keeping viewers hooked, or simply finding the time to write. The good news? There are powerful tools that can help you plan, structure, and polish scripts faster—without sacrificing quality. In this guide, you’ll discover the best AI tools for YouTube script writing, how to use them effectively, and which one fits your workflow.

AI Tools for YouTube Script Writing 1

Quick Summary

  • Script writing tools can cut your content creation time by 50–70%
  • Best for: YouTubers, marketers, educators, faceless channels
  • Top picks:
    • Jasper – best for storytelling
    • Copy.ai – beginner-friendly
    • Writesonic – budget-friendly option
    • Rytr – quick scripts on demand
  • Ideal for: hooks, outlines, full scripts, SEO optimization

🔍 What Are AI Tools for YouTube Script Writing?

These tools help you:

  • Generate video ideas
  • Create engaging hooks
  • Structure full scripts
  • Optimize content for audience retention

Instead of starting from scratch, you get a solid draft in minutes—which you can then refine.


🧠 Why YouTube Creators Are Using Script Writing Tools

Let’s be real—YouTube success depends heavily on retention and storytelling.

Here’s how these tools help:

🚀 Key Benefits

  • Save hours of brainstorming
  • Improve storytelling flow
  • Generate click-worthy hooks
  • Maintain consistent posting schedule
  • Reduce creative burnout

💡 If you’ve ever stared at a blank screen for 30 minutes, this is a game-changer.


🏆 Best AI Tools for YouTube Script Writing

1. Jasper – Best for High-Quality Storytelling

Best for: Professional creators & long-form content

Features:

  • Long-form script generation
  • YouTube intro & hook templates
  • Tone customization
  • SEO-focused content creation

Pros:

  • Excellent output quality
  • Great for storytelling channels
  • Multiple templates

Cons:

  • Higher pricing
  • Learning curve for beginners

2. Copy.ai – Best for Beginners

Best for: New YouTubers & quick scripts

Features:

  • Simple interface
  • Script outline generator
  • Idea brainstorming tools

Pros:

  • Easy to use
  • Fast results
  • Free plan available

Cons:

  • Limited long-form capabilities

3. Writesonic – Best Budget Option

Best for: Creators on a budget

Features:

  • YouTube script templates
  • Blog-to-video conversion
  • SEO integration

Pros:

  • Affordable pricing
  • Good for bulk content
  • Multi-language support

Cons:

  • Output may need editing

4. Rytr – Best for Quick Scripts

Best for: Fast content creation

Features:

  • Short script generation
  • Multiple tones
  • Minimal setup

Pros:

  • Very fast
  • Budget-friendly
  • Beginner-friendly

Cons:

  • Not ideal for deep storytelling

📊 Comparison Table

ToolBest ForPricingEase of UseOutput Quality
JasperLong scriptsHighMedium⭐⭐⭐⭐⭐
Copy.aiBeginnersFree/PaidEasy⭐⭐⭐⭐
WritesonicBudget creatorsLowEasy⭐⭐⭐⭐
RytrQuick scriptsLowVery Easy⭐⭐⭐

🎯 How to Choose the Right Tool

Not all tools are created equal.

Here’s what to consider:

🧩 1. Your Content Type

  • Long storytelling videos → Jasper
  • Shorts & quick videos → Rytr

💰 2. Budget

  • Tight budget → Writesonic or Rytr
  • Premium quality → Jasper

⚡ 3. Speed vs Depth

  • Need fast drafts → Copy.ai
  • Need detailed scripts → Jasper

Must Read : How to Build an AI Email Responder for Freelancers


🎥 Real-World Use Cases

1. Faceless YouTube Channels

Perfect for:

  • Tech reviews
  • Finance content
  • Educational videos

👉 Quickly generate scripts without appearing on camera.


2. Daily Content Creators

If you post daily, these tools help you:

  • Avoid burnout
  • Maintain consistency
  • Scale faster

Must Read : Best Smart Gadgets for Daily Use at Home


3. YouTube Automation Channels

Many creators use these tools to:

  • Generate bulk scripts
  • Outsource voiceovers
  • Build passive income channels

🛠️ How to Use AI Tools for Better Scripts

Here’s a simple workflow:

Step 1: Start with a Strong Prompt

Example:

  • “Write a YouTube script about smartphone tips for beginners”

Step 2: Generate Outline

Break it into:

  • Hook
  • Intro
  • Main points
  • Conclusion

Step 3: Add Personal Touch

  • Add examples
  • Include your tone
  • Improve storytelling

Step 4: Optimize for Retention

  • Short sentences
  • Pattern interrupts
  • Curiosity gaps

  • “best tools for YouTube growth”
  • “how to grow a YouTube channel fast”
  • “YouTube SEO tips for beginners”
  • “content creation tools for creators”

⚠️ Common Mistakes to Avoid

  • ❌ Publishing scripts without editing
  • ❌ Ignoring audience tone
  • ❌ Overloading with information
  • ❌ Weak video hooks

💡 Remember: tools assist—you still guide the creativity.


📈 Pro Tips for Higher Engagement

  • Start with a hook in first 5 seconds
  • Use storytelling frameworks
  • Add pattern interrupts every 20–30 seconds
  • End with a strong CTA

❓ FAQs (People Also Ask)

1. Are AI tools good for YouTube script writing?

Yes, they help generate ideas, structure content, and save time while improving consistency.


2. Can beginners use these tools?

Absolutely. Tools like Copy.ai and Rytr are beginner-friendly and require no experience.

Must Read : SEO PowerSuite Review 2026: Features, Pricing & Is It Worth It?


3. Do I need to edit generated scripts?

Yes. Editing ensures your script sounds natural and matches your voice.


4. Which tool is best for long YouTube videos?

Jasper is best for long-form, storytelling-style content.


5. Are these tools worth it?

If you create content regularly, they can significantly boost productivity and quality.


6. Can these tools help with YouTube SEO?

Yes, many tools include SEO features like keyword suggestions and optimization.


7. Are free tools enough?

Free tools work well for beginners, but paid versions offer better quality and features.


🏁 Final Verdict

If you’re serious about growing on YouTube, using the right script writing tool can give you a massive advantage.

  • Best overall: Jasper
  • Best for beginners: Copy.ai
  • Best budget option: Writesonic
  • Best for speed: Rytr

👉 Start with a tool that matches your workflow, test it, and refine your process.


🚀 Final Recommendation

Don’t try to do everything manually.

Use these tools to:

  • Save time
  • Improve script quality
  • Stay consistent

👉 Take action now: Explore one tool, test it for a week, and see the difference in your content creation process.

Ring Wired Doorbell Plus Review (2026): Is It Worth It?

0

Missed deliveries, unexpected visitors, and security concerns are exactly why smart doorbells are booming.

But here’s the real question:
Does the Ring Wired Doorbell Plus actually solve these problems, or is it just another overhyped gadget?

In this in-depth review, we’ll break down everything you need to know honestly and practically.

Ring Wired Doorbell Plus Review

⚡ Quick Summary

  • Best for: Homeowners who want reliable, always-on security
  • Video Quality: Retinal 2K (sharp and detailed)
  • Power Source: Hardwired (no battery worries)
  • Standout Feature: Low-Light Sight + 4x Zoom
  • Downside: Subscription needed for advanced features

👉 Want to see current deals? Check price or see full features


📦 What Is the Ring Wired Doorbell Plus?

The Ring Wired Doorbell Plus (newest model) is a smart, hardwired video doorbell designed for continuous home or business monitoring.

It upgrades previous models with:

  • Retinal 2K video clarity
  • Enhanced zoom capabilities
  • Improved low-light performance

In simple terms, it helps you see, hear, and respond to anyone at your door—anytime, anywhere.


🎯 Key Features & Benefits

📹 1. Retinal 2K Video Quality

  • Crisp, high-resolution video
  • Wide-angle view covers more area
  • Clear facial recognition at closer distances

👉 Ideal for spotting package thieves or identifying visitors

Must Read : Best Music Equalizer for Windows: I Tested Them All


🔍 2. 4x Enhanced Zoom

  • Zoom into distant objects
  • Capture fine details like license plates or faces
  • Smooth zoom experience via app

🌙 3. Low-Light Sight (True Color at Night)

  • Maintains color video even in dim lighting
  • Switches to sharp black-and-white in total darkness

👉 Big upgrade over traditional night vision


🚨 4. Smart Motion Detection Alerts

  • Instant alerts on your smartphone
  • Custom motion zones
  • Reduces unnecessary notifications

🧾 5. Video Descriptions (AI-powered alerts)

  • Notifications tell you what is happening
  • Example: “Person at front door” vs generic motion alert

⚠️ Requires subscription
⚠️ Not available in Illinois due to legislation

Must Read : ABBYY FineReader PDF for Windows Review: Is It Worth the Price?


🔌 6. Hardwired Power (No Charging Needed)

  • Connects to existing doorbell wiring
  • Continuous power = zero downtime
  • No battery replacements

🎨 7. Premium Design Options

Available finishes:

  • Nickel Silver
  • Polished Night Navy
  • Polished Sandstone
  • Polished Mocha

👉 Blends well with modern and classic home exteriors


📊 Pros and Cons

Pros ✅Cons ❌
Excellent 2K video qualityRequires wiring installation
No battery charging neededSubscription needed for full features
Strong low-light performanceNot ideal for renters
Reliable motion alertsVideo descriptions limited by region
Stylish design optionsInternet dependent

⚖️ Ring Wired Doorbell Plus vs Alternatives

🆚 Comparison Table

FeatureRing Wired Doorbell PlusRing Video Doorbell (Battery)Google Nest Doorbell
PowerWiredBatteryBattery/Wired
Video2K1080p960p
Zoom4xBasicModerate
Night VisionAdvancedStandardGood
SubscriptionRequiredRequiredOptional

👉 Verdict:
If you want maximum reliability and video clarity, the wired version clearly wins.


🏡 Real-World Use Cases

📦 1. Package Protection

  • Monitor deliveries in real-time
  • Replay footage if something goes missing

👨‍👩‍👧 2. Family Safety

  • Know when kids arrive home
  • Screen unknown visitors before opening the door

🏢 3. Small Business Security

  • Track customer entry
  • Monitor storefront activity

🚚 4. Delivery Monitoring

  • Get alerts the moment someone approaches
  • Avoid missed deliveries

Must Read : Boardmix Review: AI-Powered Online Whiteboard for Remote Teams


🛒 Buying Guide: Things to Consider

Before buying, ask yourself:

⚡ Do you have existing wiring?

This is a must for installation.


🌐 How strong is your Wi-Fi?

  • Weak connection = poor video performance
  • Place router near the entrance if possible

💰 Are you okay with a subscription?

To unlock full features like:

  • Video history
  • Smart alerts
  • Video descriptions

🏠 Are you renting or owning?

  • Renters may prefer battery-powered models
  • Wired version suits permanent setups

💡 Installation Overview

  • Turn off power
  • Remove existing doorbell
  • Connect wiring to Ring device
  • Mount and set up via app

👉 Average setup time: 15–30 minutes


❓ Frequently Asked Questions (FAQs)

1. Is the Ring Wired Doorbell Plus worth it?

Yes, especially if you want reliable, always-on security without charging batteries.


2. Does it work without a subscription?

Yes, but with limited features (no video history or advanced alerts).


3. Can it record at night?

Yes, thanks to Low-Light Sight, it provides color video in dim light and black-and-white in darkness.


4. Is installation difficult?

Not really. If you already have wiring, it’s straightforward.


5. Does it support mobile notifications?

Yes, you get instant alerts for motion and doorbell presses.


6. Is it good for apartments?

Not ideal unless you have permission and wiring access.


7. How does it compare to battery models?

It’s more reliable and doesn’t require charging—but less flexible.


🧾 Final Verdict: Should You Buy It?

The Ring Wired Doorbell Plus is a strong choice for anyone serious about home security.

✅ Buy it if you want:

  • High-quality 2K video
  • Always-on power
  • Reliable motion detection
  • Advanced night visibility

❌ Skip it if:

  • You don’t have wiring
  • You prefer no subscriptions
  • You need portability

🚀 Final Recommendation

If your goal is peace of mind, smarter security, and better visibility, this doorbell delivers.

How to Start a Tech Blog and Make Money (Beginner Guide)

Its fascinating to earn money online, isn’t it. Although there are many ways to do so. Technology evolves every day. New smartphones launch. AI tools appear. Software gets updated. People constantly search online to understand these changes.

That’s exactly why tech blogging still works.

Thousands of users search things like:

  • “Best budget laptop for students”
  • “How to fix Android battery drain”
  • “Best hosting for WordPress”
  • “iPhone vs Android comparison”

If you create helpful content around these questions, your blog can attract traffic — and that traffic can generate income.

The good news?

You don’t need to be a programmer or engineer to start a tech blog.

How to Start a Tech Blog and Make Money

With the right strategy, tools, and SEO approach, even beginners can build a profitable tech website.

This guide will show you exactly how to start a tech blog and make money step-by-step.


Quick Steps to Start a Tech Blog

If you’re short on time, here’s the simplified roadmap.

  1. Choose a profitable tech niche
  2. Register a domain name
  3. Buy fast and reliable hosting
  4. Install WordPress
  5. Publish SEO-optimized tech content
  6. Drive organic traffic
  7. Monetize using ads, affiliates, and digital products

Keep reading to understand each step in detail.


Step 1: Choose a Profitable Tech Blog Niche

One of the biggest mistakes beginners make is starting a broad tech blog.

“Tech” is too competitive.

Instead, focus on a specific sub-niche.

Examples of Profitable Tech Blog Niches

NicheExample Topics
Smartphone GuidesAndroid tips, iPhone tricks
Software TutorialsPhotoshop, AI tools, productivity apps
Laptop ReviewsBudget laptops, gaming laptops
WordPress TutorialsPlugins, themes, hosting
Tech TroubleshootingFix WiFi issues, battery drain

How to Pick the Right Niche

Choose a niche that has:

  • Search demand
  • Affiliate products
  • Low competition keywords
  • Your personal interest

Good niche example:

Instead of “technology blog”, choose “budget gadgets for students.”

This makes SEO easier.

Must Read : DMDE Disk Editor & Data Recovery Software Review: Features, Pros & Recovery Performance


Step 2: Choose a Domain Name

Your domain name is your blog’s identity.

Tips for Choosing a Good Tech Blog Domain

Keep it:

  • Short
  • Memorable
  • Easy to spell
  • Relevant to technology

Examples

Good examples:

  • TechGearLab
  • SmartDeviceGuide
  • GadgetFixHub

Avoid:

  • Long names
  • Numbers
  • Hyphens

Your domain should ideally use .com if available.


Step 3: Buy Reliable Web Hosting

Hosting determines your blog’s speed, uptime, and performance.

Slow websites struggle to rank on Google.

Features to Look for in Hosting

Important factors:

  • Fast loading speed
  • Free SSL certificate
  • Daily backups
  • Good customer support
  • WordPress optimization

Recommended Hosting for Tech Blogs

Many beginner bloggers choose beginner-friendly hosting that offers:

  • One-click WordPress install
  • Free domain
  • Affordable plans

If you’re starting out, simply check price and features before choosing a plan that fits your budget.

Must Read : Budget Drawing Tablet Review – Huion Inspiroy H640P


Step 4: Install WordPress

WordPress powers over 40% of websites on the internet.

It’s the easiest way to build a blog.

Why WordPress Is Ideal

Benefits include:

  • Beginner friendly
  • Highly customizable
  • SEO friendly
  • Thousands of plugins
  • Full ownership of your website

Most hosting providers allow one-click WordPress installation, which takes less than 5 minutes.

Once installed, you can start building your tech blog immediately.


Step 5: Choose a Fast and Clean Theme

Your blog design affects user experience and SEO.

A cluttered website increases bounce rate.

What Makes a Good Blog Theme

Look for:

  • Fast loading
  • Mobile friendly
  • SEO optimized
  • Clean layout
  • Customization options

Minimalist designs work best for tech blogs because they keep readers focused on content.


Step 6: Install Essential WordPress Plugins

Plugins add functionality to your website.

But don’t install too many.

Must-Have Plugins for Tech Bloggers

Plugin TypePurpose
SEO PluginOptimize posts for search engines
Cache PluginImprove site speed
Security PluginProtect your website
Backup PluginPrevent data loss
Image OptimizationCompress images

Plugins help automate many tasks that would otherwise require coding.

Must Read : Best Type C Charger with Long Wire (Fast & Reliable)


Step 7: Create High-Quality Tech Content

Content is the engine of your blog.

Without helpful content, traffic will not grow.

Types of Tech Blog Posts That Perform Well

Successful tech blogs often publish:

  • Product reviews
  • Comparison posts
  • Tutorials
  • How-to guides
  • Troubleshooting articles

Examples:

  • Best budget laptops for coding
  • How to speed up Windows 11
  • iPhone vs Android battery comparison
  • Best free AI writing tools

These topics attract search traffic.


Step 8: Use Low-Competition SEO Keywords

SEO is the main traffic source for most blogs.

Instead of targeting competitive keywords, focus on long-tail keywords.

Example

High competition keyword:

“Best laptop”

Low competition keyword:

“Best laptop for engineering students under $1000”

Long-tail keywords are easier to rank.

How to Find Keywords

You can use tools like:

  • Google Autocomplete
  • Keyword research tools
  • Competitor analysis
  • “People Also Ask” section

The goal is to identify questions people already search for.


Step 9: Drive Traffic to Your Tech Blog

Publishing content is only half the job.

You also need traffic.

Best Traffic Sources for Tech Blogs

  1. Google SEO
  2. Pinterest
  3. YouTube tutorials
  4. Quora answers
  5. Email newsletters

SEO usually becomes the largest traffic source over time.

That’s why focusing on search-friendly content is essential.


Step 10: How Tech Blogs Make Money

Now comes the exciting part.

Once your blog gets traffic, multiple monetization options open up.

1. Affiliate Marketing

Affiliate marketing is one of the most profitable strategies.

You recommend products and earn a commission when someone buys through your link.

Example products:

  • Laptops
  • Smartphones
  • Software tools
  • Hosting services
  • Gadgets

Example CTA:

Check price
See full features
Learn more

Affiliate income grows as your traffic increases.


2. Display Advertising

Display ads generate passive income.

Common networks include:

  • AdSense
  • premium ad networks
  • native ads

Ad revenue depends on:

  • Traffic volume
  • Audience location
  • Content niche

Tech blogs often get higher ad revenue because technology advertisers pay well.


3. Sponsored Posts

Companies may pay you to review their product.

This works best when your blog builds authority.

Example:

A gadget brand may pay you to review their new device.

Always keep reviews honest and transparent.


4. Digital Products

Advanced bloggers often sell their own products such as:

  • Tech courses
  • eBooks
  • Templates
  • Guides

Digital products can create higher profit margins.


Comparison: Different Tech Blog Monetization Methods

Monetization MethodDifficultyIncome Potential
Affiliate MarketingMediumHigh
Display AdsEasyMedium
Sponsored PostsMediumMedium
Digital ProductsHardVery High

Most successful bloggers combine multiple income streams.


Real-World Example: How a Tech Blog Earns

Imagine a blog reviewing laptops.

Traffic:

50,000 monthly visitors.

Possible income sources:

  • Affiliate sales from laptop reviews
  • Display ads
  • Sponsored content
  • Email marketing

Even moderate traffic can generate consistent revenue when monetized properly.


Things to Consider Before Starting

Before launching your blog, keep these factors in mind.

1. Patience Is Required

SEO traffic takes time.

Most blogs start seeing consistent growth after 6–12 months.

2. Consistency Matters

Publishing one article per month won’t work.

Try to publish 2–4 high-quality articles per week.

3. Focus on Value

Google rewards helpful content.

Always prioritize solving readers’ problems.


Internal Linking Suggestions

You can internally link to related posts such as:

  • best blogging tools for beginners
  • SEO tips for new bloggers
  • how affiliate marketing works
  • best hosting for WordPress blogs
  • keyword research for bloggers

Internal linking improves SEO and increases dwell time.


Frequently Asked Questions

1. How much does it cost to start a tech blog?

Starting a tech blog usually costs between $50–$150 per year depending on domain and hosting choices.


2. How long does it take to make money from a blog?

Most bloggers start earning within 6–12 months after building consistent traffic.


3. Do I need technical knowledge to start a tech blog?

No.

Many successful bloggers simply research products and explain technology in simple language.


4. How many posts should a new tech blog publish?

A good starting goal is 30–50 high-quality articles within the first few months.


5. Is tech blogging saturated?

The broad tech niche is competitive, but micro-niches with long-tail keywords still have huge opportunities.


6. Can I start a tech blog without coding?

Yes.

Platforms like WordPress allow you to create and manage blogs without coding skills.


Final Verdict: Is Starting a Tech Blog Worth It?

Yes — if you approach it strategically.

Tech blogging remains one of the best online business models because:

  • Technology is always evolving
  • People constantly search for tech solutions
  • Affiliate products are abundant
  • Ad revenue potential is strong

But success depends on:

  • Choosing the right niche
  • Creating helpful content
  • Targeting low-competition keywords
  • Staying consistent

If you start today and publish valuable articles regularly, your tech blog can gradually grow into a sustainable income stream.