Have you bought a new Mac? Well Apple is ia fascinating company and the world of Apple is just awesome. Apple Mac laptops and computers have a different OS called as Macintosh. There are various latest versions available of the Mac OS. In Windows it is very easy for capturing a screenshot of the screen.
There is a Printscreen button on the keyboard and you can hit that button whenever you want to take the screenshot in Windows. Well in Apple there is no such key in the keyboard. You must be wondering that How to take screenshot on Mac ? Well there are two easy methods. By these methods you will learn to capture the screenshots on your Mac which will be automatically saved on your Desktop in a PNG file format.
As we mentioned that there are 2 ways of capturing the screenshot:
1. Taking screenshot of the whole screen
2. Taking screenshot of a part of the screen
Yes both the methods are possible on Mac.
1. Taking a screenshot of the Whole screen
Just follow these simple steps while using the computer. So you can capture the screenshot any time just be following these instructions:
Step 1 : Press Command(⌘) + Shift + 3

Step 2: Hurray! You have successfully saved the screenshot in the Desktop as a *.png file
So just by pressing the three keys combination you can easily capture a screenshot on your Mac of the whole screen.
Also read : Apple iPhone 6 Review – Class personified
2. Taking screenshot of a part of the screen
Now another way of capturing a screenshot. This is a smart way as you can only capture the desired part of the screen as a screenshot. This is good because we always tend to first capture a screenshot and then later on crop the desired image as per the need. So in this case there is no need to capture and crop. You can directly while capturing select the desired portion which needs to be captured. Just follow these simple instructions:
Step 1: Press Command(⌘) + Shift + 4 . Now you can see that the cursor is changed to a crosshair pointer.

Step 2: Just move the pointer from where you want to start the screenshot.
Step 3: Click and Drag to select the desired area. If you want to adjust the area, you can do so by holding the Shift, Option or Space Bar key while dragging.
Step 3: Just after selecting the area, release the mouse or the trackpad button. (To cancel you can press the Esc button)
Step 4: Automatically the screenshot is saved in a .png file format on the desktop
So with such steps you can easily capture a screenshot on your Mac. The saved file in the PNG format will be named and saved as Screen Shot (date and time).png on your Desktop. Enjoy taking screenshots on your Mac.
With a special request from our reader Nitin Patil we are adding the process of changing the default location of the screenshot. Updated on 02/05/2015
Changing the Default location of Screenshot
Are you fed up of moving the files after capturing from the Desktop to you desired folder? Are you a well organized person and do not want to clutter your desktop with the screenshots? If yes then this method will help you in changing the location for saving the screenshots.

Step 1: Open the Terminal
If you don`t know where the terminal is, just open the Spotlight Search. You can do it by Command+Space. Then search the keyword “Terminal”.
Step 2: Enter commands
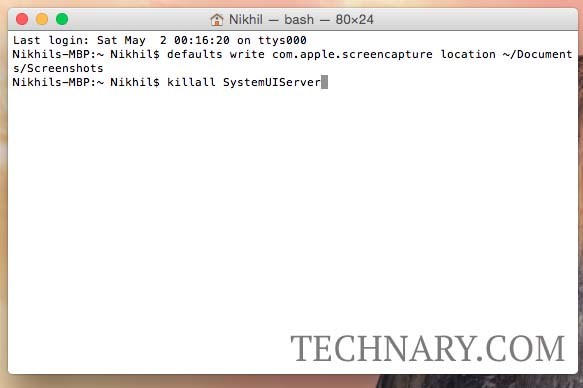
After opening the tutorial you need to enter this command:
defaults write com.apple.screencapture location ~/Documents/Screenshots
(Create a folder Screenshots before in the documents folder or enter the path of the desired folder in which you want to save the screenshots)
Step 3: Applying the commands
To apply the above command, you need to enter: killall SystemUIServer
Its done! Now your screenshots will be saved in the Screenshots folder in the Documents folder if you enter the command as it is from the Step 2. If you entered different path then the screenshots will be installed in that folder. Make sure you create the folder first and then enter the commands in the terminal.
Let us know if you like the tutorial in the comments section below.
Nikhil Narkhede
Latest posts by Nikhil Narkhede (see all)
- Best Free Video Editing App for Android - April 17, 2024
- Stuffcool Revel Magnetic Wireless Charger – Qi2 Launched - April 16, 2024
- How to Restart OnePlus Nord CE 3 - April 15, 2024
How to change default location of screenshot?
Hi Nitin, thank you for your valuable comment. We have updated the article with your requested information for changing the default location of screenshot. Keep visiting Technary.com Kindly share the article if you liked it. Cheers!